Question:
Transform the binary search tree into a sorted two-way linked list.
do not use recursion.
do not create any new node, only adjust the pointer to point.
10
/ \
6 14
/ \ / \
4 8 12 16
-->>
4=6=8=10=12=14=16
struct BSTreeNode
{
int m_nValue; // value of node
BSTreeNode *m_pLeft; // left child of node
BSTreeNode *m_pRight; // right child of node
};
Answer:
inline BSTreeNode* eleminateMinNode(BSTreeNode** tree) {
BSTreeNode* treeHead = tree;
if (!treeHead)
return 0;
BSTreeNode treeHeadParent = 0;
while (treeHead->m_pLeft) {
treeHeadParent = treeHead;
treeHead = treeHead->m_pLeft;
}
if (treeHeadParent)
treeHeadParent->m_pLeft = treeHead->m_pRight;
if (treeHead == *tree)
*tree = treeHead->m_pRight;
return treeHead;
}
inline BSTreeNode* eleminateMaxNode(BSTreeNode** tree) {
BSTreeNode* treeHead = tree;
if (!treeHead)
return 0;
BSTreeNode treeHeadParent = 0;
while (treeHead->m_pRight) {
treeHeadParent = treeHead;
treeHead = treeHead->m_pRight;
}
if (treeHeadParent)
treeHeadParent->m_pRight = treeHead->m_pLeft;
if (treeHead == *tree)
*tree = treeHead->m_pLeft;
return treeHead;
}
void BSTreeToDoubleLinkChainInternal(BSTreeNode* tree, BSTreeNode** headp, BSTreeNode** tailp) {
if (!tree)
return;
BSTreeNode* tail = tree;
BSTreeNode* right = tail->m_pRight;
BSTreeNode* minRight = eleminateMinNode(&right);
while (minRight && minRight != tail) {
tail->m_pRight = minRight;
minRight->m_pLeft = tail;
tail = minRight;
minRight = eleminateMinNode(&right);
}
tail->m_pRight = 0;
BSTreeNode* left = tree->m_pLeft;
BSTreeNode* maxLeft = eleminateMaxNode(&left);
BSTreeNode* head = tree;
while (maxLeft && maxLeft != head) {
head->m_pLeft = maxLeft;
maxLeft->m_pRight = head;
head = maxLeft;
maxLeft = eleminateMaxNode(&left);
}
head->m_pLeft = 0;
*headp = head;
*tailp = tail;
}
Take heed therefore how ye hear
恩赐
所以,你们应当小心怎样听;因为凡有的,还要加给他;凡没有的,连他自以为有的,也要夺去。” (路加福音 8:18 和合本)
Take heed therefore how ye hear: for whosoever hath, to him shall be given; and whosoever hath not, from him shall be taken even that which he seemeth to have. (Luke 8:18 KJV)
这句话与撒种的比喻和交银的比喻(19:26)连在一起。正确的听是很重要的,不要像比喻中那不结果实的种子。“凡有的还要加给他”,也是在提醒我们同一个功课。这当然不是个鼓励有钱阶级的信息,它是与听神的道有关的。也就是说,当一个人,谦卑地领受主的教导,那么神就会把更多的真理赐给他,让他明白的更多,领受的更多。如果一个人,在神面前骄傲,他不仅没有办法领受到更多真理,甚至连自己已经明白的一些也会失去。这样的观念,也可以用在恩赐的使用上,如果我们认真使用神所赐的,就有添加,如果不用,甚至连我们自以为有的也会失去。

Reset user password for your own Ghost blog
If you do not config mail up for your ghost blog,
it maybe a big problem once you lost your user password.
however, methods are always more than problems.
We can fix it up by reset it.
1. Find out your database name in your ghost config, it is maybe in config.production.json
"database": {
"client": "mysql",
"connection": {
"host": "localhost",
"user": "ghost-452",
"password": "dade1b0565f2585e07c7",
"database": "ghost_production_acm"
2. Use mysql to reset the password.
mysql -u root -p
Enter the password for root account.
mysql> use ghost_production_acm;
mysql> select * from users;
ghost use bcrypthash for the password.
You can get bcrypt hash string from http://bcrypthashgenerator.apphb.com/

mysql>update users set password='
$2b$10$PaL8tKcU4i0CsjRrM6BhROVQMwwLFw2HSx/kWlAUgja23fNllc2Fy' where email='your@email';
#Additionally : if the account has been locked,
#you can set status to active to unlock the account, like that:
#update users set status = “active”;
mysql>flush privileges;
mysql>quit
3.Restart your ghost blog and login again.
ghost stop
ghost start
config.production.json
Set up ghost(a fully open source, hackable platform for building and running a modern online publication) on your google compute engine.
https://docs.ghost.org/docs
https://ghost.org/
Ubuntu 16.04 is recommended as your server OS.
If you are first login into your blog server,
Please Create a New User and Give Super User Privileges as well.
$adduser <user>
$usermod -aG sudo <user>
$su - <user>
Install Pre-requisites:
$sudo apt-get update
$sudo apt-get upgrade
#nginx
$sudo apt-get install nginx
$sudo ufw allow 'Nginx Full'
$sudo apt-get install mysql-server
#Warning
During mysql installation, you will be prompted to create a root password. Please ensure that you actually specify a value for this, as leaving the root password blank will make Ghost-CLI unable to connect to the database.
#Adding swap memory if needed
If your system has less than 1GB memory, you may run into errors. To overcome this, configure a larger amount of swap memory:
$dd if=/dev/zero of=/var/swap bs=1k count=1024k
$mkswap /var/swap
$swapon /var/swap
$echo '/var/swap swap swap default 0 0' >> /etc/fstab
#nodejs
$curl -sL https://deb.nodesource.com/setup_6.x | sudo -E bash
$sudo apt-get install -y nodejs
#install ghost-cli
$sudo npm i -g ghost-cli
#install ghost
$sudo mkdir -p /var/www/ghost
$sudo chown [user]:[user] /var/www/ghost
$cd /var/www/ghost
$ghost install
#The CLI will asks you for the minimum required information.
Enter your blog Url:
This is the url your blog will be available at and must include the protocol. e.g http://myblog.com for HTTP or https://myblog.com for HTTPS.
If you want to setup SSL, your domain must already be pointing at your server. If your domain is ready and resolved, then you can enter the https version of your domain, and choose "yes" later when asked if you want to setup SSL.
If your domain is not yet ready, enter the http version of your domain and choose no when prompted about SSL. When your domain is resolved, you can run ghost config url [https domain] && ghost setup ssl to run the ssl setup.
Enter your MySQL hostname [localhost]:
This determines where your MySQL database can be accessed from. For the most cases the user installs MySQL on the same server, in this case use localhost (press [enter] to use the default value).
Enter your MySQL username:
Enter your MySQL username. If you have already created a mysql user, password and database with the correct credentials ready for Ghost, enter those details now. Else, enter root and your MySQL root password and Ghost will generate a custom MySQL user for you.
Enter your MySQL password: [hidden]
The password for the MySQL user you entered in the previous step.
Ghost database name:
Here you have to enter the name of your database. If you install multiple instances of ghost on your server you need to specify a different database for each instance. If the database you entered does not exist already and you provided your root credentials it will be created for you.
If you pass a non-root MySQL username and password, this database must already exist and your user must have privileges for this database.
Do you wish to set up a ghost MySQL user?
If you provided your root MySQL user, Ghost CLI can create a custom MySQL user that can only access/edit your Ghost database. This is recommended, and Ghost-CLI takes care of this for you if you accept.
Do you wish to set up nginx?
Sets NGINX up for your blog enabling it to be viewed by the outside world. You can optionally set this up yourself.
Do you wish to set up ssl?
If you do not already have a valid ssl certificate installed for your blog and wish to use secure protocol, Ghost-CLI can take of this for you using the Let's Encrypt certification service. Otherwise you have to setup ssl by your own.
Your domain must have resolved to your server in order for the SSL setup to work. If you choose no now, you can run ghost setup ssl later to rerun this step.
Enter your email (used for SSL certificate generation)
This is required for SSL certification so that you can be kept informed if there is any issue with your certificate such as requiring renewal.
Do you wish to set up systemd?
systemd is the recommended process manager tool for keeping Ghost running. Choose yes to have it configured for you, or no if you're happy setting up process management yourself.
Do you want to start Ghost?
Choose whether you want to have Ghost running right away.
#Once install done, let's start your blog.
$ghost start
Then you can open your blog url via any web browser. e.g. my blog:
https://errong.win
You can login into your ghost blog via https://[blogurl]/ghost
e.g. my blog ghost admin area.
https://errong.win/ghost

Set up proxy server on your google compute engine via squid
Install squid
sudo apt install squid3
Install apache utils
sudo apt-get install apache2-utils
This Installs the htpasswd utility that allows for creating password files.
Copy the default configuration file to back it up.
This configuration file is ridiculously huge and has way more than any simple case would need. We will just back it up and make a new one with only the information that we need.
sudo cp /etc/squid/squid.conf /etc/squid/squid.conf.original
Delete the old configuration file
sudo rm /etc/squid/squid.conf
Make a new configuration files
sudo vi /etc/squid/squid.conf
Enter this in the config file
auth_param basic program /usr/lib/squid/basic_ncsa_auth /etc/squid/passwords
auth_param basic realm proxy
acl authenticated proxy_auth REQUIRED
http_access allow authenticated
# Choose the port you want. Default is 3128, but we set it to 7777
http_port 7777
The first bit (4 lines) sets squid to require passwords
The last bit configures squid to use port 7777. You can change this to anything you want.
Save the file in vi with [esc]:wq
Set up the username and password
sudo htpasswd -c /etc/squid/passwords [username]
Replace [username] with any username you want to use
You will be asked to enter and reenter a password for the username that you entered. make sure they match.
Restart the squid service
sudo systemctl restart squid.service
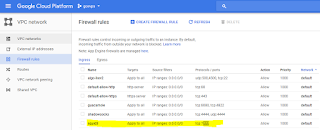
The last step, please not forget to set up a new firewall rule for http_port
sudo apt install squid3
Install apache utils
sudo apt-get install apache2-utils
This Installs the htpasswd utility that allows for creating password files.
Copy the default configuration file to back it up.
This configuration file is ridiculously huge and has way more than any simple case would need. We will just back it up and make a new one with only the information that we need.
sudo cp /etc/squid/squid.conf /etc/squid/squid.conf.original
Delete the old configuration file
sudo rm /etc/squid/squid.conf
Make a new configuration files
sudo vi /etc/squid/squid.conf
Enter this in the config file
auth_param basic program /usr/lib/squid/basic_ncsa_auth /etc/squid/passwords
auth_param basic realm proxy
acl authenticated proxy_auth REQUIRED
http_access allow authenticated
# Choose the port you want. Default is 3128, but we set it to 7777
http_port 7777
The first bit (4 lines) sets squid to require passwords
The last bit configures squid to use port 7777. You can change this to anything you want.
Save the file in vi with [esc]:wq
Set up the username and password
sudo htpasswd -c /etc/squid/passwords [username]
Replace [username] with any username you want to use
You will be asked to enter and reenter a password for the username that you entered. make sure they match.
Restart the squid service
sudo systemctl restart squid.service
The last step, please not forget to set up a new firewall rule for http_port

四种结果
“这比喻乃是这样:种子就是神的道。 那些在路旁的,就是人听了道,随后魔鬼来,从他们心里把道夺去,恐怕他们信了得救。 那些在磐石上的,就是人听道,欢喜领受,但心中没有根,不过暂时相信,及至遇见试炼就退后了。 那落在荆棘里的,就是人听了道,走开以后,被今生的思虑、钱财、宴乐挤住了,便结不出成熟的子粒来。 那落在好土里的,就是人听了道,持守在诚实善良的心里,并且忍耐着结实。” (路加福音 8:11-15 和合本)
Now the parable is this: The seed is the word of God.Those by the way side are they that hear; then cometh the devil, and taketh away the word out of their hearts, lest they should believe and be saved.They on the rock are they, which, when they hear, receive the word with joy; and these have no root, which for a while believe, and in time of temptation fall away.And that which fell among thorns are they, which, when they have heard, go forth, and are choked with cares and riches and pleasures of this life, and bring no fruit to perfection.But that on the good ground are they, which in an honest and good heart, having heard the word, keep it, and bring forth fruit with patience. (Luke 8:11-15 KJV)
在听道的人群中,有一些人是属于第一种情况,如文士们,他们心里早已有了自己的主张,魔鬼早已把很多错误的道理塞在他们的心里,使他们把这些错误的道理当作正确的,他们用他们所相信的,所以为的这些道理,去判断一切,以至于真理根本无法进入他们的心。今天,有人以为无神论是正确的,有人认为佛教的理论是正确的,也有人笃信可兰经的理论,所以他们的心再也没有办法听见别的。魔鬼就是那迷惑人的,把错误的道理充满人的心,目的就是为了抵挡圣经的真理,这就是飞鸟来吃尽了的现象。
也有一些人,他们听了道,情感上愿意接受,很兴奋,但是并没有让主的道深深地进入他们的心里,也没有把自己的生命真正的交托主。他们觉得这道很好,就接受了,一旦为主的道遭遇艰难和痛苦,他们马上就退后了,这是第二种情况!
第三种情况是,他们觉得主很好,也愿意接受相信,但是他们放不下这个世界,各种各样的思虑、钱财等等的迷惑,以致他们不能够真心的跟随主!就像那个来找主的少年财主,最后因着放不下钱财,忧忧愁愁地走了。
而最后一种人,就像彼得保罗这些人,他们有一个诚实的心,听见主的道,蒙了光照后,就接受耶稣基督作他们的救主。既是真理,他们就不顾一切地跟随,不管遇到多少艰难险阻,也跟随到底,以至于结果累累,这就是最后一种田地。

Subscribe to:
Comments (Atom)
fixed: embedded-redis: Unable to run on macOS Sonoma
Issue you might see below error while trying to run embedded-redis for your testing on your macOS after you upgrade to Sonoma. java.la...
-
Issue you might see below error while trying to run embedded-redis for your testing on your macOS after you upgrade to Sonoma. java.la...
-
Introduction In distributed systems, maintaining context across microservices is crucial for effective logging and tracing. The Mapped Di...
-
 If you do not config mail up for your ghost blog, it maybe a big problem once you lost your user password. however, methods are always mor...
